
DocScan HD is a great app to have on your classroom ipad/s. No more long walks to the only printer in the school that is capable of scanning documents - very convenient.
Our class is currently creating multi-media poetry slideshows using google presentation as the tool to present our final products. Part of the success criteria for this assignment, includes the students creating their own artwork to support their poetry. Last year (pre ipad) I had to individually scan students artwork using the school photocopier. As students aren't allowed access to the photocopier, I had to do this myself, after hours. After scanning the work, I then had to upload the images to student folders on the school server. From there, the students had to download their images to use in their presentations - all rather time consuming.
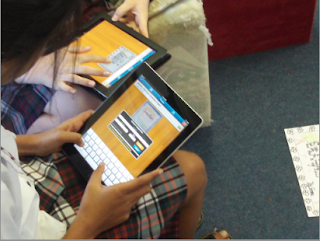
Using Docscan on the ipad to do the same task is very convenient. Students also take the responsibility for scanning their own artwork, less work for the teacher. Once the document is scanned, students email the document to their google apps account. It sends the file as a pdf and appears in their docs once sent. From there it is a simple case of students opening the document, screen capturing the image and inserting into their presentation - easy.
Saturday, November 12, 2011
Wednesday, November 2, 2011
Sock Puppets
Sock Puppets is a neat app that allows you to create your own lip-synched videos and share them on Facebook and YouTube.
Here is the blurb from the itunes app store ...
"Add Puppets, props, scenery, and backgrounds and start creating. Hit the record button and the puppets automatically lip-synch to your voice. Friends can work together with multiple puppets and create hilarious conversations. While recording simply tap a puppet and that puppet will lip-synch, tap a different puppet and switch auto lip-synching to it. Switch backgrounds to take your puppets to different places, move the puppets, props and scenery to animate them while recording. Cartoon and photo realistic puppets are included."
As soon as I discovered sock puppets, I knew my class would love it. I introduced the app to my class yesterday and asked for suggestions on how we could use it to support our learning in class. A couple of students suggested we could use sock puppets as a presentation tool, to publish our poetry that we are currently working on.
Sock Puppets is free, although if you want extra features like extended recording time and extra characters, you will need to upgrade. I found the 30 second record time was actually ideal for the purpose of capturing students short poems.
The app itself is pretty intuitive to use. In no time at all my students had downloaded the app to their ipod touches, and had worked out how to create and send their completed sock puppet presentations to our class youtube account. I could see this particular app working really well with junior classes. Here are a couple of examples ...
Thursday, October 6, 2011
Find my idevice!
In our recent digital citizenship conversations we have been having as a class, certain themes have tended to emerge. One of these has been digital security. Our class have been learning how to create secure passwords and we have been identifying areas that could compromise our security when using the internet. As part of these discussions we have also been looking at ways of keeping our devices physically safe.
This week I introduced my class to a cool app called find my iphone. This is an app I have recently installed on my ipad and it has a number of features that will help me if I should ever misplace of have my device stolen.
Here's how it works. Download the app from the app store (it's free). Sign in with your Apple ID on your device and turn on Find My iPhone to allow you to locate it. Then use the same Apple ID to turn on Find My iPhone on your other iOS 4.2 (or later) devices including iPhone 3G, 3GS, or iPod touch (2nd generation or later).
Find My iPhone is also included with a MobileMe subscription. As I don't have another iOS device, I can use the mobile me website, accessed from any computer to locate my ipad.
You’ll see your device’s location on a map and you can choose to have it display a message or play a sound, remotely lock the device, or wipe it to permanently delete all of your data if you think that it won’t be returned. For added security, the app will automatically sign you out after 15 minutes, or you can manually sign out at any time.
Pretty cool features which give users another level of physical security for their idevices.
Wednesday, September 14, 2011
QR Codes in the Classroom
This past week my students have been playing around with QR codes. I've been thinking about how I could use them with my class. I have been particularly interested in how they can be used to "connect" various types of media together, eg; print and digital.
As part of their weekly homelearning, my class have been completing a variety of tasks based around the Rugby World Cup. Each student has their own wiki page dedicated to their RWC adopted team. Students have been busy creating and completing all sorts of cool activities. My class have also created their own rugerbees as part of a short art activity.
Using a code generator we created individual QR codes which were then glued to students artwork.
Scanning the code with a smartphone, ipod touch, ipad etc will take you through to the URL which links with a student's wiki page dedicated to their adopted team providing all sorts of wonderful information about their adopted team and country.
We then stuck our artwork on the class window with an explanation.
By showcasing the artwork on the classroom windows, I'm hoping it will spark some interest amongst other students and teachers as to what QR codes are, and their potential use as an educational tool. My own class have had lots of fun creating and scanning some of the codes on the artwork through the window using their ipod touches.
This has been such a fantastic exercise in generating discussion amongst my class as to how else QR codes could be used to share and support other aspects of their learning.
Tuesday, May 17, 2011
Lego Comic Builder
Lego Comic Builder is fun! My class loved using the various lego elements to create their own comic strips.
Lego Comic Builder is very easy to use as well:
• choose a format for your comic (one box or multiple boxes in a variety of formats)
• drag whatever lego elements you want in your comic into the boxes
• resize any of the elements to fit the frame
• add speech bubbles etc
• your comic strip can use multiple pages
• you can save your comic online ( to complete later) or download it to your computer
Here are three examples of our digital citizenship work using lego comic builder. Click on the image to enlarge.
Wednesday, April 20, 2011
Picmarker
Picmarker is a watermarking tool which is quick and easy to use for copyrighting images or even naming students digital work.
Some of the features are:
• upload files from your computer or grab them from your Flicr, FB or Picasa
account
• add text watermark, image watermark or tiled watermark
• no need to download or install software
• free - unless you want the pro version with a few more bells and whistles
I used picmarker to watermark my class avatars. Our class uses a number of wikis as part of our online learning management system and students use avatars to identify themselves on these wikis. Although the students recognise themselves by their avatars, their teacher needed some other way of identifying them easily for management of work purposes.
Here is an example of what the watermarked avatars look like. Click on the image to enlarge.
Tuesday, April 19, 2011
Photovisi
Photovisi is an image tool that our class has been using to publish some of their most recent work. You have a range of templates to choose from (some are padlocked - pro users only). Simply select and upload your photos and photovisi will automatically generate your collage.
What my class really liked about this particular tool was the options it gave them to manipulate their collage once their photos were loaded. You can easily crop, replace, delete, add text, change background colours etc.
Here is an example their teacher created for a front page on one of their class wiki.
Thursday, March 31, 2011
Prezi
Prezi is a neat presentation tool that kids can use as an alternative to keynote or powerpoint. What I really like about it, is that it is not slide based as are most presentations. Prezi is a flash based application that allows you to create non-linear presentations where you can zoom in and out of a visual map containing words, links, images, videos, etc
The interface itself is pretty intuitive, once you've worked out how to manipulate the "zebra" I had a play with it the other day and in no time I had made my first presentation. As with most of these tools, you can sign up as an educator (school website url and email address required) and then you are set to create an account for your class to use.
A number of my students were pretty keen to use this tool to showcase their most recent learning. Here is an example of a student's cultural heritage presentation.
Friday, March 18, 2011
Twiducate (2)
Twiducate is more than just a cool tool for bookmarking links, important dates and posting homelearning etc.
The other week I used it with my class in, what I think, was a real neat 21st century way. We had been having some discussion around what "culture" means. I got my kids in groups of 3 and they logged onto our class twiducate account. I then posted the question to the class, "What does the word "culture" mean to your group?
All groups posted their replies back to me, and as a class we went over them using the data projector. I then asked them, in their groups again, to use the "like" button to indicate which of the group definitions they thought was the "best" answer. Again, using the data projector, it was clear that one particular group's definition was the clear favourite amongst the class, having the most "likes" From there, as a class, we further developed this particular definition to arrive at a whole class shared definition of what "culture" is.
It was alot of fun and most kids were fully engaged for the duration of the activity :-)
Wednesday, March 2, 2011
Social Media
I've been thinking alot about communication lately. I read recently where email as a form of communication is fast disappearing from the digital landscape and social media is the cool tool for the "now" Our kids certainly understand this and as educators we need to make sure we are meeting these "communication" needs within our own classrooms.
I still have a number of issues with facebook and twitter as options for use within the classroom. This has led me on a search for an alternative that meets my needs as a teacher (moderation, security etc) as well as the needs of my students. Twiducate is an option that is well worth exploring for your own classroom. As part of my presentation for the Learning @ Schools Conference held in Rotorua recently, I shared how my class is using twiducate on a day to day basis.
If you are looking for a closed micro blogging platform, where the teacher has full control over posts and chat, then check out twiducate - I'm sure you'll be impressed.
Thursday, February 10, 2011
Audio Tools
Vocaroo is a neat audio tool my class started using late last year. It is essentially an internet voice mail service. Some of the features include being able to ...
• Send your voice message to others via email
• Send your voice message to others via a link
• Embed your voice message into blogs or wikis
• Download your voice message
What I really like about vocaroo is that it is so quick and easy to use. Perfect for capturing student voice in the classroom.
Our class used it last year to record our prior knowledge about out topic study.
These were then embedded into our wiki page, easy for the teacher to access and refer to.
Here is an example ...
Friday, January 28, 2011
Online Class Environments (2)
Following on from my last post, and thinking about the big ideas that underpin elearning pedagogy, I've decided to create multiple online environments to document students learning journeys. This will hopefully provide them with greater opportunities to document various aspects of their learning in ways which I never explored last year.
This is a progression from last year, where my focus was on establishing a class wikispace. It focussed mainly on showcasing students finished work. It wasn't until the end of the year that I started thinking about how I could use digital tools to capture the process as well as the product.
Here is an example, click on the image to enlarge it.
The idea here was to capture a student's planning process through to her writing a draft copy of a simple informational report on a rainforest animal. The template for the planning process was created using Inspiration software. There are many resources available to help with this process. This particular template I used was one in a CD series created by Jacqui Sharp
As well as developing the process and product aspect of documenting students learning journeys via wikis, I've finally got around to establishing individual students blogs. Much has been written about the benefits students derive from blogging, and I'm quite keen to see how my students go with this ... I'm pretty sure they will love it.
For student blogs I'm using kidblog. I choose this platform as it enables the teacher to moderate blogs and restrict viewing options, plus it is so simple to set up.
Wednesday, January 26, 2011
Online Class Environments
My physical classroom environment set-up has been put on hold for a while ... let's just say it is a work in progress. I've had more success thinking about how my online class environments will look this year. Some of the big ideas that underpin elearning pedagogy have helped me make decisions on which direction to take.
First, the notion that classrooms in the 21st century should be "open walled" enabling learning to occur wherever and whenever. I've renamed our class wiki to help promote this idea in the minds of my students - I even took a screen shot of the wiki banner, ran it through PosteRazor (which is a free mac app that allows you to blow images up a large as "printed it off - laminated it and stuck it on the "front" wall of the class.
If you have a mac go to http://www.macupdate.com/app/mac/20738/posterazor
Looking for a web 2.0 tool? http://www.blockposters.com/
I'm hoping this poster will help promote some discussion amongst students.
Second, the notion that social media is the means by which students today communciate and learn. I found this to be particularly true of my class last year. Out of a class of 30 students, 29 had facebook accounts. I was quite surprised (although I guess I shouldn’t have been). With this in mind, I’m going to trial a “closed platform” network for my class this year, it does have a few limitations, but the potential for creating new and rich learning experiences is huge - I’ll post more on this later.
Saturday, January 22, 2011
A vision for elearning
My main focus this year is to move in the direction of establishing an authentic elearning classroom. Whether I "arrive" at the end of the year or not remains to be seen, but I see it as an ongoing journey that probably has no "final" destination ... which is I think is good thing - keeps teaching / learning fresh and relevant. The main thing is to be on the road and moving in the right direction.
One of the big "a-ha" moments for me personally, was in coming to grips with the differences between a digital classroom and an elearning one. Have a look at this slideshow, it is quite helpful.
Digital classrooms focus on the tools and their availability (1-1 computing), the mode of delivery is usually teacher instruction.
With elearning classrooms there would seem to be a "better fit" (in my opinion) with the key competencies. Children facillitate their own learning through understanding their preferred learning style and by choosing the appropriate tools to meet these ends. Social media is the medium by which they communicate and learn. Students develop their own learning pathways and document these through eportfolios. There is a focus on self reflection and assessment. Finally, classrooms become "open walled' where learning occurs whenever and wherever.
This is the challenge for me in 2011, to embrace this paradigm for teaching and create multiple learning environments where my students will have success in their own learning journeys.
One of the big "a-ha" moments for me personally, was in coming to grips with the differences between a digital classroom and an elearning one. Have a look at this slideshow, it is quite helpful.
The e learning classroom
View more presentations from Jacqui Sharp.
Digital classrooms focus on the tools and their availability (1-1 computing), the mode of delivery is usually teacher instruction.
With elearning classrooms there would seem to be a "better fit" (in my opinion) with the key competencies. Children facillitate their own learning through understanding their preferred learning style and by choosing the appropriate tools to meet these ends. Social media is the medium by which they communicate and learn. Students develop their own learning pathways and document these through eportfolios. There is a focus on self reflection and assessment. Finally, classrooms become "open walled' where learning occurs whenever and wherever.
This is the challenge for me in 2011, to embrace this paradigm for teaching and create multiple learning environments where my students will have success in their own learning journeys.
Wednesday, January 19, 2011
Classroom Environment
The school year is fast approaching and I thought I'd better have a look at how I'm going to set up my classroom to further develop the vision of elearning with my new class. I've been doing a bit of reading about "educational spaces" and wanted to see what I could do to promote these ideas in my own classroom environment. Below is a great blog about these "ideas" The video about Ordrup school is well worth a look, I found it to be quite inspiring ...
http://edu.blogs.com/edublogs/2010/11/ordrup-seven-spaces-of-technology-school-environments-embodied.html
It's really neat to see schools who are embracing this type of vision for learning ....
Anyway ... back to my class. I have a prefab with 32 students this year. My first idea was to try and get the computers off the walls - easier said than done. All the power points are located on the walls. I tried running long extension leads over the beams and dropping them down onto table groups - not a good look, as a colleague remarked ..."I'm sure that contravenes a number of health and safety laws" She was right of course .. it looked like a dog's breakfast.
As it turns out, I'd have nowhere for the students to sit anyway if I continued down this road. The desktop computers will remain against the walls ... for now anyway :-( I haven't got very far creating any secret spaces etc either ... need to really think hard about this one, I can certainly see the value in them. It's quite an art just to cram 32 students plus desks into a prefab space.
I'm still keeping a small mat space for me to work with small groups of kids ... I know, I know old habits die hard - anyway what I have managed to do is ... remove my desk from the equation. The teacher now has no desk in the classroom environment. This is quite revolutionary for me, I don't know how I'll cope, or where I'll put those coffee cups and packets of panadol !
Subscribe to:
Posts (Atom)