Tiki-Toki is an excellent website for getting your students to create interactive timelines. I have used this for a few years now and have found it to be to very helpful in engaging my visual learners.
To sign up you need an email (my class use their google emails and a separate password). The free account only gives you the ability to make one timeline. It won't allow you to embed your timeline, but you can share it via a link to your e-portfolio etc. With a paid teacher account, timelines can be embedded in a class or teacher website. Along with the teacher account, students can create accounts using a class code and can collaborate on timelines.
What I really like about tiki-toki is that students are able to embed text, images and videos into their timelines giving them a very professional look and feel.
To create a timeline, students needs to first choose the start and end dates for their timeline. They then need to select a background image (copying / pasting link to image). From there, students can enter specific dates, add text and other media such as youtube videos.
Tiki-toki is an excellent resource, intuitive and fun to use and guaranteed to get your students excited about sharing their learning via this medium.
Click the link to see Paige's biographical timeline on Stan Lee.
Web Tools for Schools
Wednesday, June 25, 2014
Tuesday, June 24, 2014
Using Angry Birds to Engage Writers
My class is currently working on persuasive writing. They have completed all the usual tasks associated with learning the skills of structuring their writing correctly, selecting appropriate language to support their arguments and publishing / sharing their writing. I sensed throughout this unit that many of my kids weren’t as engaged as what they could have been, and I wondered whether my choice of writing tasks wasn’t really targeting their interests.
In my search for new writing ideas, I recently came across the website www.theliteracyshed.com. It is filled with a range of excellent ideas, resources and examples that will help support your classroom literacy programme. One idea I have used from this site that really engaged the class and produced some positive writing outcomes, was based around an ad for the Angry Birds app.
The task I set my class was to write a persuasive letter from the perspective of either an angry bird or one of the pigs. If they were a bird they had to argue for their eggs back or if they were a pig - to get the birds to stop attacking them.
Having watched the video, we brainstormed all the various reasons as to why there was conflict between the birds and pigs. Some of the ideas the kids came up with were very insightful. I also supplied the class with a wide range of a words they could choose from to use in their writing to help persuade their audience. I asked my slower writers to choose between 3 - 6 of those words and my more capable writers to use as many as they could. One of my students used 25 out of the 26 words!
In terms of engagement, I felt this was a task everyone of my students had bought into. Everyone of them had played angry birds and enjoyed the game. This was evident in the writing that most of my class produced. I was really impressed by their efforts, a direct reflection in their engagement of the writing task.
Monday, November 19, 2012
Piktochart
Piktochart is a web 2.0 tool that enables the user to create cool looking infographics.
They say a picture is worth a thousand words and infographics are a great way to convey a complicated subject or something with lots of statistics in a very simple, easy to follow visual story. They are also very appealing from a visual perspective, and serve to capture an audiences attention. For further benefits of using this particular medium to present information, see this article - Why Infographics and Data Visualisation Work
My class have been looking at inventions and inventors as part of our wider authentic learning journey which sought to answer the question - As a human race, have we really come that far? Getting students to showcase their learning through the visual medium of infographics seemed like the perfect opportunity to bring some of their research data to life within a meaningful context.
As with most of these types of tools, you have the option of creating a free account or you can sign up to a premium account (extra features). As our school uses google apps for ed, all my class already have individual emails which is really handy when creating accounts for web 2.0 tools that require them. To create a free account you need an active email address and a password. As my class were working with a partner, I told them this would be the one time where sharing a password with their partner would be in fact be helpful in case their partner was absent.
As with most of these types of tools, you have the option of creating a free account or you can sign up to a premium account (extra features). As our school uses google apps for ed, all my class already have individual emails which is really handy when creating accounts for web 2.0 tools that require them. To create a free account you need an active email address and a password. As my class were working with a partner, I told them this would be the one time where sharing a password with their partner would be in fact be helpful in case their partner was absent.
Piktochart is pretty intuitive to use and a good idea is to allow students time just to play and experiment with the features before they start their own. Prior to publishing our infographics we spent a fair amount of time dissecting the visual components of these infographic examples and talking about how symbols, charts, colour, design, layout and text all work together to create an effective presentation. Jacqui Sharp’s infographics wikispace (still a work in progress) is a great resource I used with my class to examine these particular components.
Sunday, October 28, 2012
Google Sketchup & Augmented Reality
Earlier on this year my class were given the task of designing or replicating an example of architecture they had been studying, as part of our unit on ancient civilizations. They used Google Sketchup to create their drawings.
Inglobe Technologies offers a plugin for google sketchup that allows files the students have created to be viewed using augmented reality technology. To get this going in your own class, you need the following:
- A computer with a webcam
- Google Sketchup (free download)
- AR plugin for sketchup (free trial download)
- A marker ( can be printed off here)
Students created videos of themselves presenting their augmented reality creations using quicktime (for mac).
Once the videos were made, the students were able to share these via their eportfolios.
If you are looking for more ways on how to utilise this powerful technology within your own classroom, take a look at my presentation on QR Codes and AR technology within the classroom.
Wednesday, March 21, 2012
Augmented Reality and SMART Goals
Our class recently completed writing their SMART goals for the first semester. Past experience have taught me that many students tend to publish their goals and then file them away in their portfolios never to be seen again until evaluation time, usually at the end of the semester.
For goal setting to truly be effective, students need a plan of action with checkpoints along the way to ensure they are meeting their set expectations. Furthermore, their goals need to be easily accessible where they can be reflected upon at regular intervals.
I’ve been experimenting with a couple of augmented reality apps on my iphone recently and thought this technology could offer an interesting solution for motivating students to revisit, reflect and share their goals with others in the class.
Here is the process we went through to make this happen. We first made a wall display of
student photos.
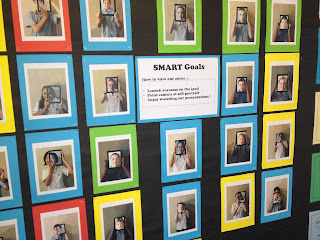
student photos.

These were created using the ipad (self portraits) and then each portrait was run through an online photo enhancer to give them all a slight cartoon appearance. Students then videoed themselves using the class ipad, outlining what their SMART goals for the semester were.
We then used a free augmented reality app, aurasma lite - only works on iphone and ipad, to create an “aura” of each of the students work. For further explanation of what an aura is and how to create one, visit aurasma’s youtube channel.
When the app is activated and the ipad camera is pointed at a particular self portrait, the student’s video of their goal explanation is superimposed on top of it.
Here is a video of students using the ipad and aurasma. Apologies for the poor audio quality, but the video should illustrate the concept.
Certainly a real improvement on a static wall display of students goal setting!
There is a real “wow” factor amongst students when using this technology. From a teacher’s perspective, this has provided me with further motivation to explore other teaching / learning opportunities for using augmented reality within the classroom programme.
I’ve set my class the challenge of thinking up some more uses for using this technology in their learning.
What about you? How else could you see augmented reality technology being used in the classroom? I’d be interested to hear your suggestions.
Wednesday, February 15, 2012
QR Coded ipad Self Portraits
At the beginning of the year I usually get my class to create self portraits focussing on sketching techniques etc. While most students usually find success with this activity, I always have a few who really struggle with the drawing process. This year I chose to do something completely different, the focus was on getting every student to feel successful in what they had created. The ipad self portrait provided the perfect vehicle for this.
Creating a self portrait using the ipad is a relatively simple process. The student takes a photo of themselves (head / face etc) using the front camera of the ipad. The second stage involves the student positioning the ipad with the photo while another student takes a separate photo of them.
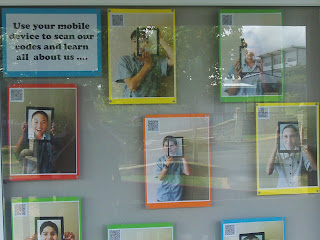
I thought it would be a great idea to also get my class to add some biographical details to their self portraits via QR codes. For this task we used www.qrstuff.com to make our codes. The codes were printed out and glued to the portraits. Scanning the codes with a smartphone or other device reveals added detail about the person in the portrait. The finished products were displayed on our classroom windows.
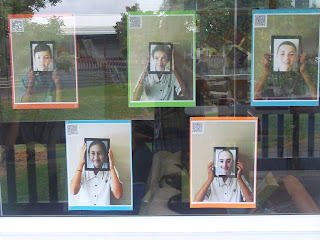
All the children were quite impressed with what they had created ... so was their teacher.
Creating a self portrait using the ipad is a relatively simple process. The student takes a photo of themselves (head / face etc) using the front camera of the ipad. The second stage involves the student positioning the ipad with the photo while another student takes a separate photo of them.

I thought it would be a great idea to also get my class to add some biographical details to their self portraits via QR codes. For this task we used www.qrstuff.com to make our codes. The codes were printed out and glued to the portraits. Scanning the codes with a smartphone or other device reveals added detail about the person in the portrait. The finished products were displayed on our classroom windows.

All the children were quite impressed with what they had created ... so was their teacher.
Saturday, November 12, 2011
DocScan HD
 DocScan HD is a great app to have on your classroom ipad/s. No more long walks to the only printer in the school that is capable of scanning documents - very convenient.
 Our class is currently creating multi-media poetry slideshows using google presentation as the tool to present our final products. Part of the success criteria for this assignment, includes the students creating their own artwork to support their poetry. Last year (pre ipad) I had to individually scan students artwork using the school photocopier. As students aren't allowed access to the photocopier, I had to do this myself, after hours. After scanning the work, I then had to upload the images to student folders on the school server. From there, the students had to download their images to use in their presentations - all rather time consuming.
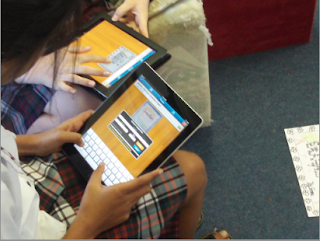
Using Docscan on the ipad to do the same task is very convenient. Students also take the responsibility for scanning their own artwork, less work for the teacher. Once the document is scanned, students email the document to their google apps account. It sends the file as a pdf and appears in their docs once sent. From there it is a simple case of students opening the document, screen capturing the image and inserting into their presentation - easy.
Subscribe to:
Posts (Atom)

